1. One-time setup
-
Step 1
Switch on the new features
In Supabase, open SQL Editor > New query, paste everything from
supabase/features-update.sqland press Run. Until you do, the new sections say "the committee is switching this on". It is safe to run again. -
Step 2
Turn on automatic renewal reminders (optional)
In Supabase, open Database > Extensions and enable pg_cron. Then run this once in the SQL Editor:
select cron.schedule('kenewa-renewal-reminders', '0 22 * * *',
  'select public.send_renewal_reminders()');
Every morning it reminds members whose renewal is due in the next 30 days (a notification, and an email if member emails are set up). Without it, the Treasurer can run
select public.send_renewal_reminders();once a week. -
Step 3
The logo and app icon
Done (October 2026): the website and the home-screen app use the KENEWA logo. If the logo ever changes, replace these files with the same names and sizes:
images/logo-mark.svg(header, footer and browser tab),images/favicon.png(48 × 48),images/apple-touch-icon.png(180 × 180),images/app-icon-192.png(192 × 192),images/app-icon-512.png(512 × 512),images/app-icon-maskable.png(512 × 512, logo in the middle 80%),images/logo.png(the full logo for search engines) andimages/og-image.png(1200 × 630, the picture shown when a link is shared). Members who already added the app may need to remove it and add it again to see a new icon.
2. Add photos
-
Step 1
Get permission first
Only use photos where the people in them agreed. At events, announce or put up a sign that photos will be taken for the website, and give people an easy way to say no. For children: only with a parent's permission, and never write a child's name in a caption (Child Safe Policy). If anyone asks for a photo to come down, remove its line straight away.
Members send photos through Share your photos. Each one arrives in Netlify (Forms > photo-share) with the photos and four permission ticks: who took it, everyone shown agreed, a parent agreed for any child, and that you may take it down. Requests to remove a photo arrive in Forms > photo-removal: take the photo down within two days and reply to say it's done. Keep the submissions as your record of permission.
-
Step 2
Make the photo web-sized
On your phone, open squoosh.app in the browser and open the photo. Under Resize, set the width to 1600. Under Compress, choose MozJPEG at quality 75. Download it. It should be under 300 KB.
-
Step 3
Name it and put it in the album folder
Use lowercase words and hyphens, no spaces:
dancing.jpg,nyama-choma.jpg. Put it in a folder named after the event's id (the last part of its address on the Events page, for exampleevents.html#jamhuri-2026), for exampleimages/photos/jamhuri-2026/dancing.jpg. For photos not from an event, any short folder name works, e.g.images/photos/committee-2026/. -
Step 4
Add one line to the photo list
Open
js/photos-data.js. Add a line at the top of the list (newest first), like this:{ file: "images/photos/jamhuri-2026/dancing.jpg", caption: "Dancing at Jamhuri Day", alt: "Members dancing in a circle in the park", album: "jamhuri-2026", home: true, cover: true },- caption: a few words shown on the photo.
- alt: what the photo shows, for people who can't see it.
- album: the event's id, so the album gets its name and date automatically.
- home: true: also show it on the home page (the 6 newest).
- cover: true: the album's cover, also shown on the event's card. One per album.
Keep the comma at the end of each line. If a page stops showing photos, a missing comma or quote is the usual cause.
-
Step 5
Publish and check
Upload the photo and the changed
js/photos-data.jsthe way you normally publish the website. Then check the home page, Photos and Events. Albums and the lightbox (tap a photo to see it big) build themselves. The stock photos on the home page are replaced automatically once you have photos markedhome: true.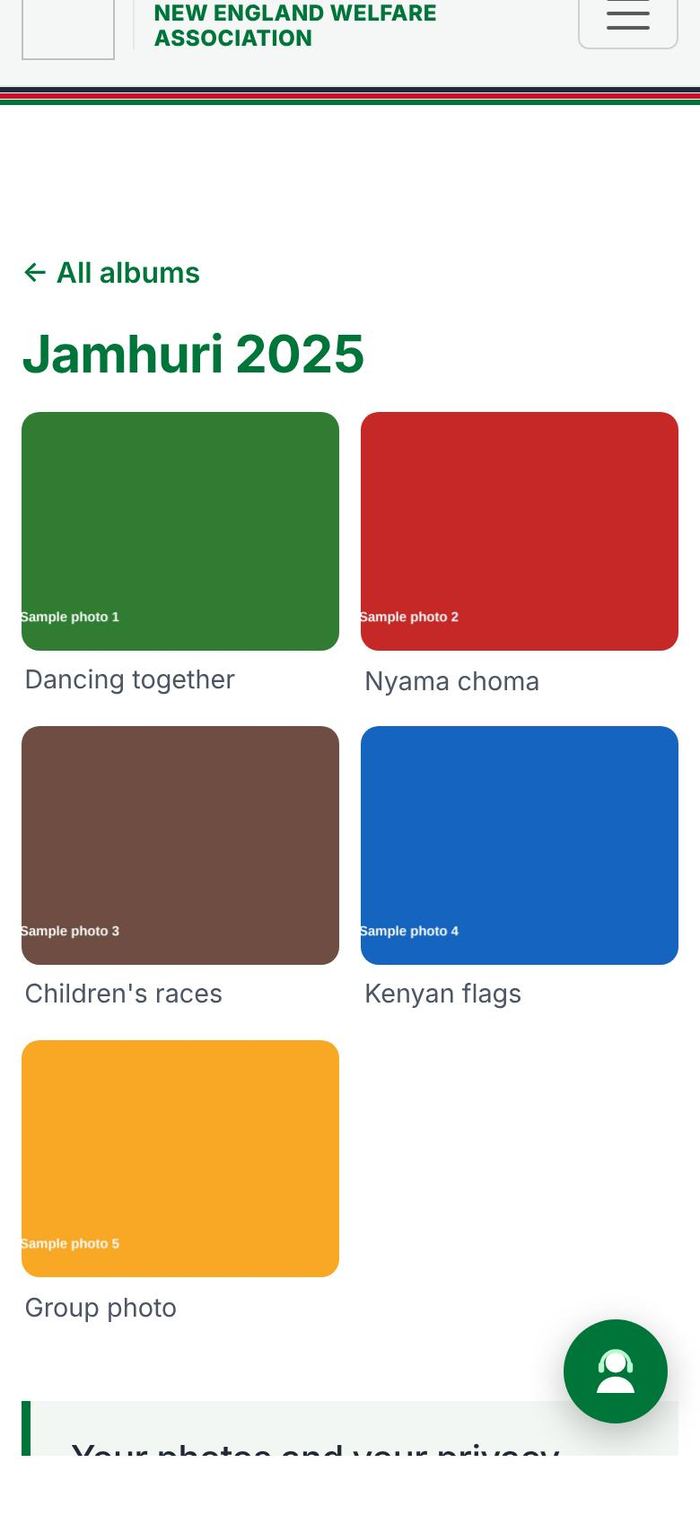
-
After each event
Collect real photos from the day
For six months after an event, the Events page shows it under Recent events with a Share your photos button (the event's name is filled in for people). Photos arrive in Netlify under Forms > photo-share. Check the consent answers, then add the best ones with steps 1 to 5 above, using the event's id as the
album. The card then changes to See the photos by itself.Ask in the WhatsApp group the day after: "Please share your photos from today at kenewa.org/share-photos".
-
Home page
The welcome slide photos
The five slides at the top of the home page use drawings from
images/banners/and the Jamhuri Day picture. To use your own photo, upload a wide photo (about 1800 pixels wide, under 400 KB) toimages/, then near the end ofcss/style.csschange that slide's line, for example.hero-slide-3 { --slide-photo: url("../images/your-photo.jpg"); }. Choose a photo where everyone agreed to be on the website. -
Home page
News, noticeboard, members' words and businesses
Three more lists work the same way as the photo list:
js/quotes-data.js: "What our members say". The section stays hidden until you add a quote. Only use a member's own words, with their permission, and the name they agree to.js/news-data.js: "Latest from KENEWA" (the 3 newest news items) and the Noticeboard (short reminders). Put the newest news and the most important notice at the top.js/businesses-data.js: businesses shown on the public home page. Only with the owner's permission. The full directory stays in the members area.
Copy the example line in the file, remove the two slashes at the start, change the details, and publish.
3. Events and "I'll bring" lists
-
Step 1
Add or change an event
On the committee page, open Events and RSVPs. Fill in the event's name, date, start and finish times, where it is and who it's for, then tap Add event. To change one, tap Change next to it in All events. The Events page, the home page and members' phone calendars update within a minute.
- Status: "Details to be confirmed" until the venue is booked, then "Confirmed".
- Next big event: tick it for the one event to show at the top of the Events page and the home page.
- Hide keeps an event but takes it off the website. Delete removes it.
If the database can't be reached, the website shows the back-up list in
js/events-data.js. Copy important events there too once a term. -
Step 2
Add the "I'll bring" list
In the same form, type one item per line under "I'll bring" list, for example
Chapati (30). Members sign up for one item each in Community > Events and RSVP. Write amounts in brackets so people know how much. -
Step 3
See who's coming
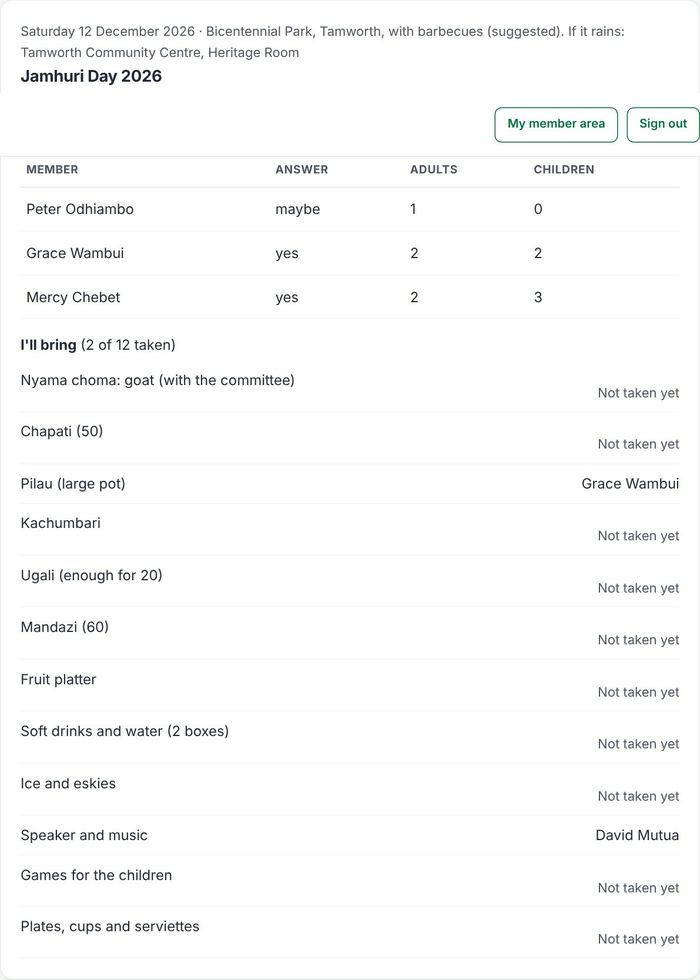
Lower down on the same page, Who's coming shows how many adults and children are coming, the maybes and the can't-comes, who answered, and who is bringing what. Use the numbers for food, chairs and the venue booking.
4. Appeals
-
Step 1
Open an appeal
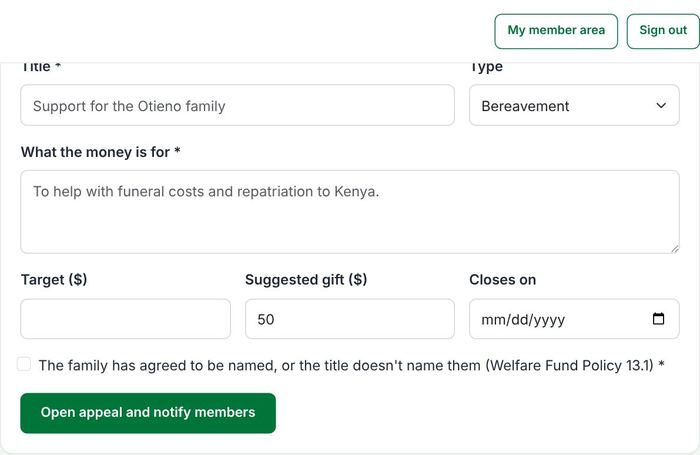
On the committee page, open Appeals. Give a title, say clearly what the money is for (Welfare Fund Policy 14.3), and set a target, a suggested gift and a closing date. Only name a family if they agree (Policy 13.1). Every member is notified; also share it in the WhatsApp group.
Appeals to members only don't need a fundraising authority. Before asking the public, check the NSW Charitable Fundraising Act rules first (see README).
-
Step 2
Confirm gifts and pass on messages
Members pay by PayID with a reference such as
KN-0004-AP3(member number, AP, appeal number), then tap I've paid on the appeal. The Treasurer checks the bank and taps Confirm (or records the gift under Payments > Record a payment if the member didn't). Members only see the total and how many gave. Open messages for the family and tap Copy all messages to put them in a card. Close the appeal when it ends.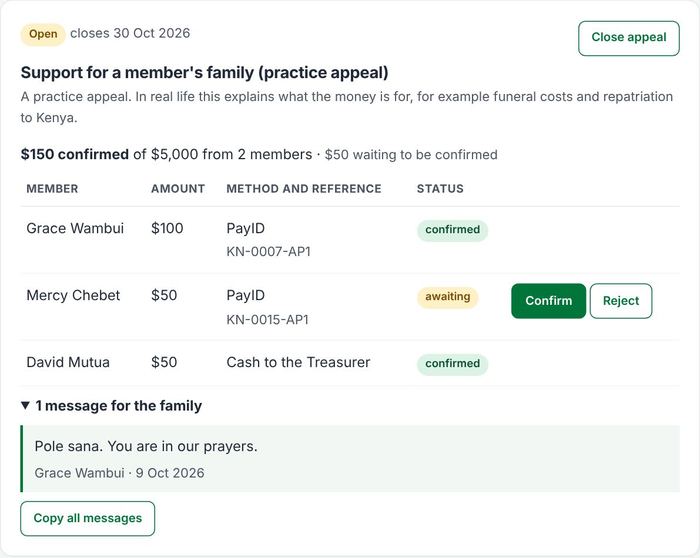
-
Step 3 (optional)
Show the appeal on the home page
Only if the family agrees: tick Show progress on the public website when opening the appeal, or tap Show on website on an open appeal. The home page then shows a progress bar with the public title, the total and how many people gave, never who gave. People from outside KENEWA give by bank transfer with the reference
APand the appeal number (for exampleAP3). Add those gifts under Gifts from outside the members area so the bar stays right. Tap Hide from website at any time. Keep public fundraising under $15,000 a year.
4b. Monthly newsletter and phone notifications
-
Each month
Write and send the newsletter
On the committee page, open Newsletter. Write a subject and the message in plain words: a blank line starts a new paragraph, a line starting with
#is a heading and a line starting with-is a bullet point. Tap Preview, then Send a test to me and check the email on your phone. When it looks right, tap Send to all subscribers.The unsubscribe link and KENEWA's address are added to every email by themselves (Spam Act 2003). Never add people yourself: they sign up at kenewa.org/newsletter or in the members area.
-
Automatic
Phone notifications
Members who turn on phone notifications (members area > Notifications) get every notification on their phone: new appeals, meetings and messages you send from Send notification. They also get a reminder at about 9am the day before an event they said they're going to, and before meetings. You don't need to do anything else.
5. Meetings and the AGM
-
Step 1
Call the meeting
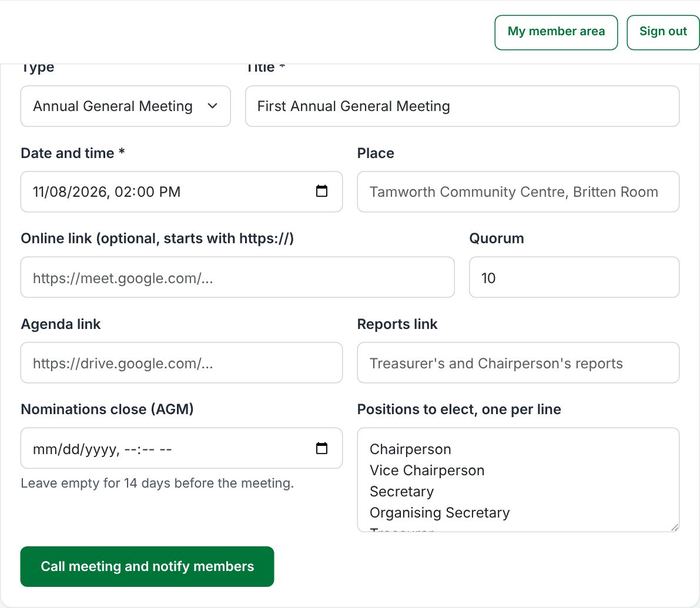
On the committee page, open Meetings and fill in the date, place, quorum and any online link. Add the agenda and reports as links (Google Drive, shared as "Anyone with the link"). For an AGM, nominations close 14 days before unless you set another time (constitution 22.2). Calling the meeting notifies every member; also send the formal notice the constitution requires (clause 30).
-
Step 2
Follow answers, proxies and nominations
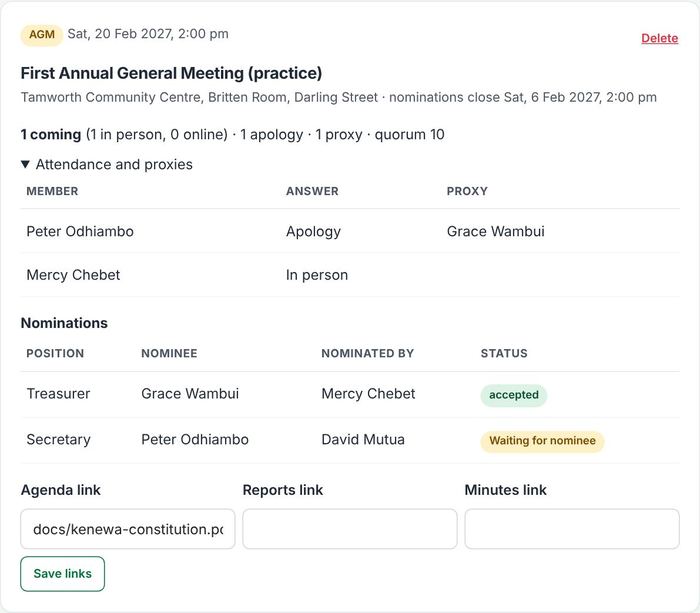
You see who is coming, the apologies, and who appointed which proxy (proxies must be financial members, clause 32.2). Nominations need the nominee to accept: that is their "signature" under clause 22.2. The candidates list is shown to members automatically. After the meeting, add the minutes link so members can read them.
6. Payments, renewals and receipts
-
Treasurer
Record each payment from the bank
Members pay by PayID or bank transfer (no cash) and don't record anything themselves. At least twice a week, open the bank statement, then on the committee page open Payments > Record a payment. Type the reference the member used (for example
OTIENO-JOINorKN-0004-RENEW): the member and what it's for fill themselves in. Check the amount and the date it reached the bank, then tap Record payment. It counts as confirmed straight away: the member is notified, gets a receipt, and for joining fees their welfare services unlock. You can't record your own payments: the Chairperson records the Treasurer's. Recorded something by mistake? Confirmed payments can't be changed on the committee page: ask the Secretary to correct it in Supabase, and note the correction in the finance records. -
Renewals
How renewal dates work
Constitution 13.5: welfare membership lasts 12 months from the date the Treasurer confirms the joining fee or the latest renewal. Members see "paid until" on the Pay screen and a reminder from 30 days before. They have 3 months after the due date to keep voting rights (13.3). Confirming a payment records the date automatically.
-
Receipts
Receipts and statements
Members print or save a receipt for every confirmed payment, and a yearly statement (1 July to 30 June). Receipts show the association's ABN and say donations aren't tax deductible. No work for the Treasurer: confirming the payment is enough.
7. Chama, mentoring and the business directory
-
Step 1
Switch them on
Run
supabase/services-update.sqlonce in the Supabase SQL Editor (afterfeatures-update.sql). -
Step 2
Create a chama circle
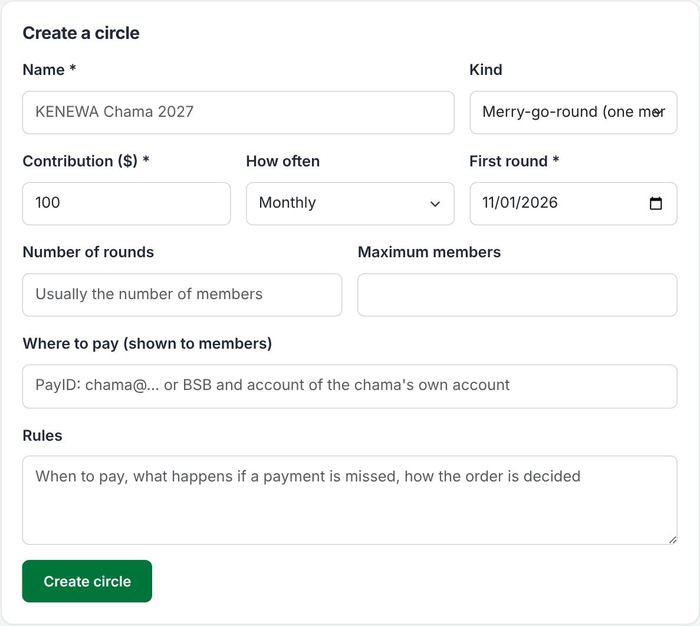
On the committee page, open Chama. Choose merry-go-round (each round one member receives the whole pot) or savings (shared out at the end), the contribution, how often, the first round and the number of rounds. In Where to pay, give the chama's own PayID or bank account: chama money is members' savings and must stay separate from the welfare fund. Add the rules members agreed.
-
Step 3
Run the circle
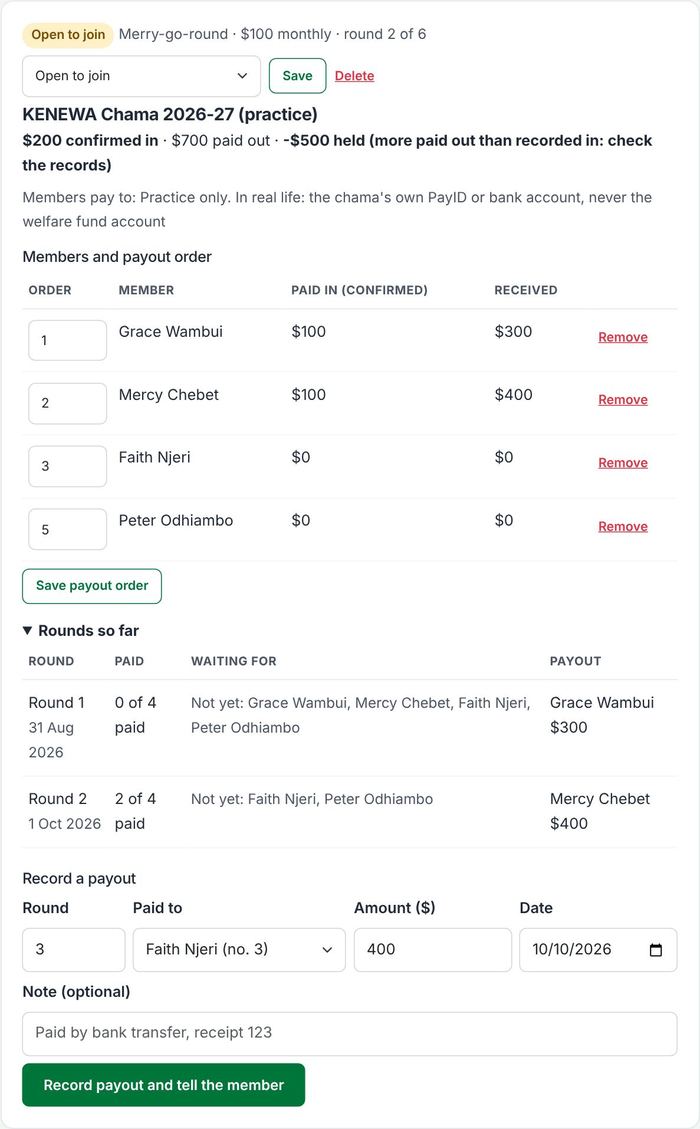
- Approve members who ask to join; each gets the next number in the payout order.
- Change the payout order by typing the numbers and tapping Save (two members can't share a number).
- Confirm each contribution when it reaches the chama account (reference such as
KN-0004-CH1R2: member, circle 1, round 2). - Rounds so far shows who has and hasn't paid each round.
- Record a payout: the form suggests the next round, the member whose turn it is, and the pot. The member is notified.
- Set the circle to Running when it's full, and Closed at the end of the cycle.
-
Mentoring
Mentoring and careers network
Nothing to manage. Members offer to mentor or ask for a mentor; contact details are shared only when the mentor accepts. Encourage members in health, education, agriculture, trades and business to sign up as mentors.
-
Businesses
Business directory
Members list up to 3 businesses each. On the committee page, open Business directory to Hide a listing that isn't appropriate (the owner sees it's hidden and can't unhide it) or remove it.
7. Members, resets and rollback
-
Step 1
Switch it on
In the Supabase SQL Editor, run
supabase/reset-update.sql, thensupabase/admin-update.sql(after the other update files). If you ever runreset-update.sqlagain, runadmin-update.sqlagain straight after. The committee needs at least two members with committee access, because resets, erases and rollbacks always need a second person to approve. -
Step 2
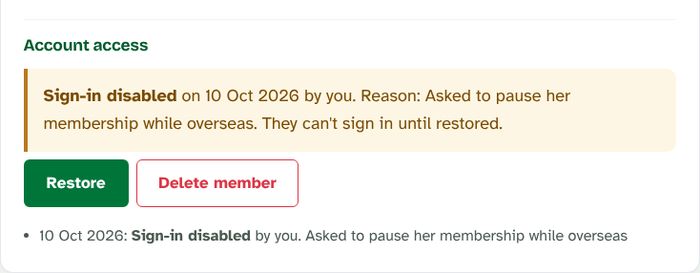
Disable, delete or restore a member
On the committee page, open Members, tap the member and scroll to Account access. Each one asks for a reason, which is kept in a log.
- Disable sign-in: they can't sign in. Nothing is deleted. Use it for a pause, an unpaid membership under review, or a lost phone.
- Delete member: they move to Members > Deleted and can't sign in. Their records are kept.
- Restore: undoes either, straight away. They sign in as before, with everything where they left it.
Committee members, and your own account, can't be disabled or deleted. Remove someone from the committee first (Supabase > Table Editor > committee).
-
Step 3
Erase a member for good
Only for someone already in Deleted, for example when they ask for their information to be removed. Tap Erase permanently and give a reason; the Chairperson or Secretary approves it on the Reset and rollback page. Their confirmed payments go to the finance archive first, then their login and everything linked to it is removed. Restoring the member before approval cancels the erase.
-
Step 4
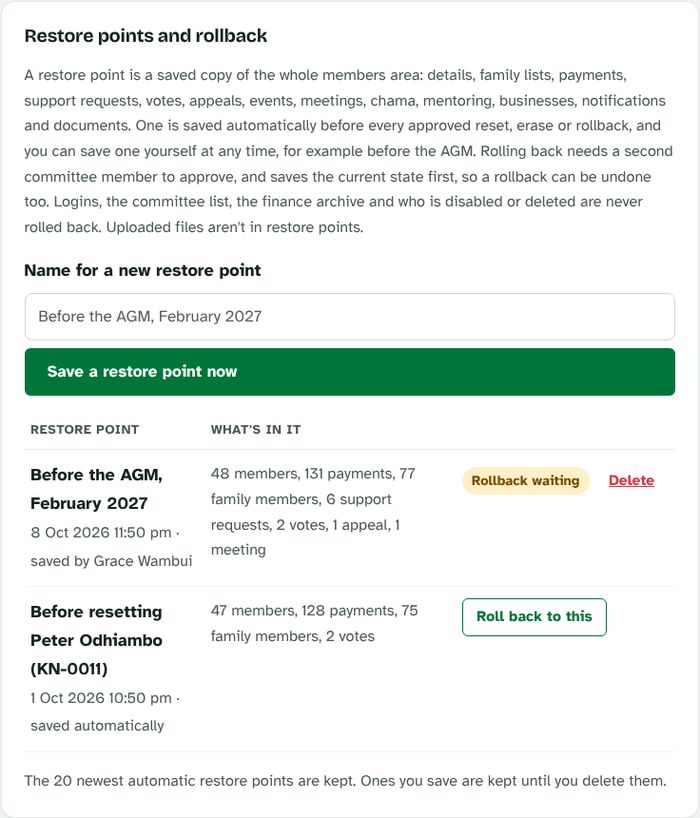
Save restore points
Open Reset and rollback. A restore point is a saved copy of the whole members area. One is saved automatically before every approved reset, erase or rollback. Save your own before big moments: the AGM, a vote, or a clean-up. Give it a clear name, such as "Before the AGM, February 2027".
Not included: logins, the committee list, settings, the finance archive, and uploaded files.
-
Step 5
Ask for a reset
- One member’s account: choose the member and give a reason. They keep their login and start again from step 1. Members can also ask for this themselves, at the bottom of My details ("Start again").
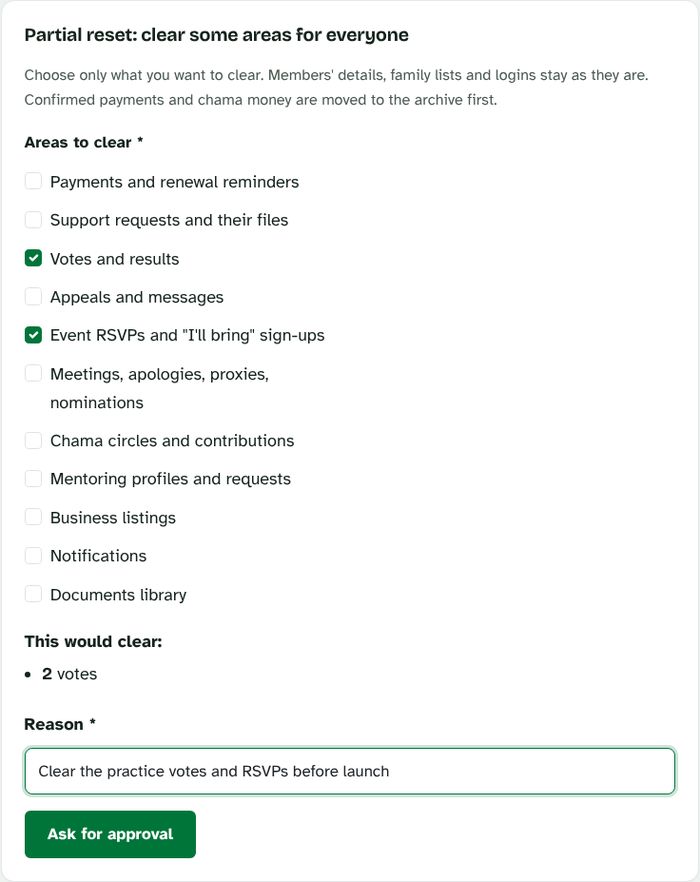
- Partial reset: tick only the areas to clear for everyone, for example the practice votes and RSVPs. Members' details and family lists stay.
You always see exactly what would be cleared before you ask. Only the Chairperson and the Secretary can ask for a reset or rollback. The fresh start for the whole members area has been switched off.
-
Step 6
Roll back
If something went wrong (a reset by mistake, a vote set up with the wrong candidates), tap Roll back to this next to a restore point and give a reason. Once approved, the members area goes back to how it was at that moment: details, family lists, payments, votes, appeals, events, meetings, chama, mentoring, businesses and notifications. Who is disabled or deleted stays as it is now. People who signed up after the restore point keep their login but register again. A restore point of the current state is saved first, so a rollback can be undone too.
-
Step 7
Approve (the other of the Chairperson and Secretary)
The Chairperson or the Secretary (not the one who asked) opens Reset and rollback, checks the reason and what would change, and approves (or declines with a note). Only then does anything change.
Money records are never lost: confirmed payments, chama contributions and payouts are copied to a locked archive first (Supabase > Table Editor >
finance_archive), because financial records must be kept for 7 years. Every request stays in the History list with who asked, who approved, when and why.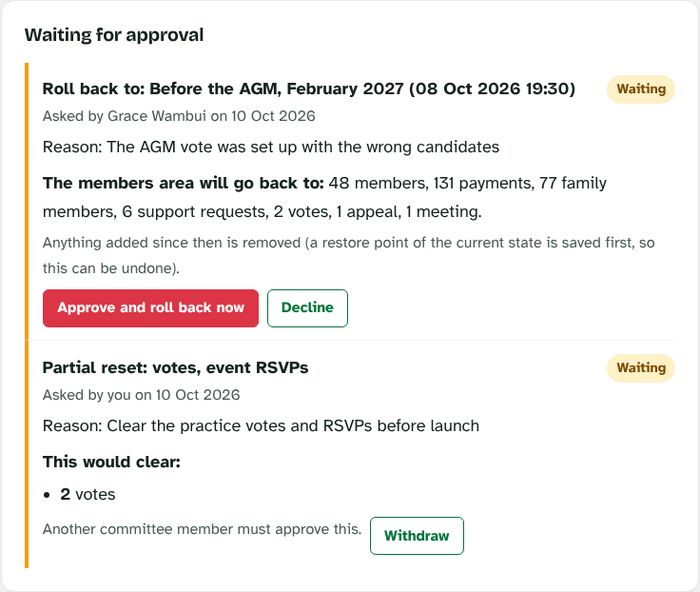
8. If something goes wrong
-
Help
Quick fixes
- "The committee is switching this on": run
supabase/features-update.sql(section 1) andsupabase/services-update.sql(section 7). - A photo doesn't show: check the file name and folder match the line exactly, including capitals and .jpg.
- The whole gallery or events list disappeared: a comma or quote is missing in the last line you edited. Undo the last change and try again.
- To practise: sign in with the practice account (demo@kenewa.org / Karibu2026). Nothing there is real.
- "The committee is switching this on": run
Members' own step-by-step guide, with the practice account: Members area guide.